 |
|

|
 10-24-2019, 01:34 PM
|
#561
|
|
Human being with feelings
Join Date: Sep 2008
Location: Calgary, AB, Canada
Posts: 6,551
|
Oh, change btn_click to:
Code:
local function btn_click(command)

	-- Be nice, give the user an Undo point
	reaper.Undo_BeginBlock()


    reaper.Main_OnCommand(reaper.NamedCommandLookup(command), 0)

	reaper.Undo_EndBlock("Typical script options", 0)


    -- Exit the script on the next update
	GUI.quit = false

end
|

|

|
|
10-24-2019, 02:03 PM
|
#562
|
|
Human being with feelings
Join Date: Nov 2009
Posts: 2,232
|
edit2:
never mind. works perfect! ignore the rest of this post.
edit:
wait. something has happened that resulted in some missing elements. i need to reconstruct. the missing material might be why the paste doesn't happen.
oops. updating. no longer crashing but, strangely, it's not running the entire action.
the actions in this test toolbar are supposed to cut a section out of an item on track one and replace it with a segment copied from track three. some of this is happening but not all. it does cut the section from track one but it does not paste the section from track three.
Last edited by babag; 10-24-2019 at 02:19 PM.
|
|
|
|
|
10-24-2019, 02:30 PM
|
#563
|
|
Human being with feelings
Join Date: Nov 2009
Posts: 2,232
|
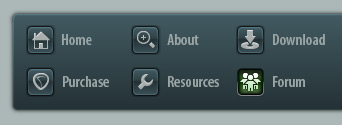
 last question
things are working now so this is not critical, i'm just curious about this. here are two screenshots of this toolbar. the first is made using the old code, the second using the new code. both show some irregularities in the drawing of the buttons. there seem to be slight differences in the spacing that results in dark or shadow areas below some, but only some, of the buttons. what causes that?


oh, yeah. is there a way to center text rather than left justifying as it is here?
thanks so much for all of the help and all of the awesome work!
babag
|
|
|
|
|
10-24-2019, 03:03 PM
|
#564
|
|
Human being with feelings
Join Date: Sep 2008
Location: Calgary, AB, Canada
Posts: 6,551
|
Elements on each layer of the GUI aren't drawn in any particular order, so with the button's 3D-ish effect it can be an issue. I've always just added a bit of padding in between them to avoid that, but you could also put them each on a separate layer by changing the value of z.
Try:
Code:
z = (#toolbar_buttons - k) + 1,
|
|
|
|
|
10-24-2019, 03:13 PM
|
#565
|
|
Human being with feelings
Join Date: Nov 2009
Posts: 2,232
|
ah! much better. never would have thought of that.

i actually tried adding a bit of padding but the way this works i got myself in trouble. it either added all the padding at the start of the row or it wound up sort of stepping, where each button was a little lower than the one to its left.
the thing that's really awesome about this is that the buttons stay where you put them. the native reaper toolbars can change their position if you accidentally bump the window and its size changes. very frustrating. this is great!
thanks again for all of the great work!
babag
Last edited by babag; 10-24-2019 at 03:19 PM.
|
|
|
|
|
10-24-2019, 05:18 PM
|
#566
|
|
Human being with feelings
Join Date: Apr 2016
Location: ASU`ogacihC
Posts: 3,921
|
Interesting. Can you dock these script windows so the window borders aren't shown? Is it possible to show images on the buttons with or without text also?
|
|
|
|
|
10-24-2019, 07:28 PM
|
#567
|
|
Human being with feelings
Join Date: Sep 2008
Location: Calgary, AB, Canada
Posts: 6,551
|
Quote:
Originally Posted by Edgemeal

Interesting. Can you dock these script windows so the window borders aren't shown? Is it possible to show images on the buttons with or without text also?
|
You can dock them just like any other Reaper window, but it's up to the person writing the script to make sure things shuffle around or resize to fit wherever you put it. None of my existing scripts worry about it because, well, I never dock things myself.
It is possible to use images with a bit of work on the scripter's part - see these scripts I made a while back for Tod. v3 of the GUI will include some of the functionality I wrote for those scripts to make images easier to deal with in general.
|
|
|
|
|
10-24-2019, 08:54 PM
|
#568
|
|
Human being with feelings
Join Date: Nov 2009
Posts: 2,232
|
it's pretty much melted my brain to get this to where it is so don't expect to get anything harder than this from me. especially since it takes special stuff being scripted in for the docking.
i have one last thing to do and then i was planning on putting the code up for anyone who wants it and in hopes that smarter people than me will do things like you're asking for (would love to be able to use pngs or something for the buttons).
the last thing i need to do now is to figure out how to calculate how many rows of buttons there are. i put a section in at the start for user preferences in which the user can put in numbers for things like button width, height, vertical and horizontal space, between buttons. the width of the window is calculated based on the preferences for number of buttons per row, button width, and horizontal space between buttons. that works fine. the vertical is harder, though, as i need to know how many buttons there are in total so i can figure out the number of rows which will, in turn, give me the vertical size of the window. i'd been doing it manually as i made this for myself but, if i'm going to give it away, i ought to make it work more easily in other scenarios.
anyway, i haven't figured out yet how to get the total number of buttons. probably has to do with running through the table a first time before the actual 'for' loop that draws the buttons.
hopefully that will come soon and i'll put this up for others to improve on.
edit:
oh, yeah. how would i make the buttons darker?
thanks,
babag
Last edited by babag; 10-24-2019 at 09:13 PM.
|
|
|
|
|
10-24-2019, 09:22 PM
|
#569
|
|
Human being with feelings
Join Date: Nov 2009
Posts: 2,232
|
ok. here it is. hopefully, someone will make it better.
Code:
-- NoIndex: true

-- Makes an 8 x 8 grid of buttons user can put actions into.
-- Grid can be modified by editing User Options section to get the desired grid size.
-- Script was made to solve problem of Reaper floating toolbar rearranging buttons if window was resized by accident or otherwise.

-- The Core library must be loaded prior to anything else

local lib_path = reaper.GetExtState("Lokasenna_GUI", "lib_path_v2")
if not lib_path or lib_path == "" then
    reaper.MB("Couldn't load the Lokasenna_GUI library. Please run 'Script: Set Lokasenna_GUI v2 library path.lua' in your Action List.", "Whoops!", 0)
    return
end
loadfile(lib_path .. "Core.lua")()


GUI.req("Classes/Class - Button.lua")()


-- If any of the requested libraries weren't found, abort the script.
if missing_lib then return 0 end


------------------------------------
-------- USER OPTIONS --------------
------------------------------------

local button_width      = 58    -- Set your button width  here
local button_height     = 28    -- Set your button height here
local buttons_per_row   = 8     -- Set how many buttons you want in each row here
local button_h_spacer   = 3     -- Set how much horizontal space between buttons here
local button_v_spacer   = 2     -- Set how much vertical   space between buttons here


------------------------------------
-------- Functions  ----------------
------------------------------------

local function btn_click(command)

	-- Be nice, give the user an Undo point
	reaper.Undo_BeginBlock()

    reaper.Main_OnCommand(reaper.NamedCommandLookup(command), 0)

	reaper.Undo_EndBlock("Toolbar Grid Template", 0)

    -- Exit the script on the next update
	GUI.quit = false

end


------------------------------------
-------- GUI Elements --------------
------------------------------------

local elms = {}

-- Define your buttons below.

-- Copy, delete, or comment out label/command lines below to get the number of buttons you want.

-- Label field is for text that will be displayed on the the button.
-- Example: label = "PLAY\n130%",
-- Note that the \n causes a line break and will display the text on two lines.

-- Command field is for the command ID from the actions list.
-- Example 1: command = 65535
-- Example 2: command = "_eed3041ab48a593fcd3909218c058b46"
-- Note that example 1 has no quotes as it is a native Reaper action.
-- Note that example 2 has quotes as it is a custom action.
-- Note that command = 65535 can be used as a spacer. It is a "no-op" action.
-- Text can still be displayed even if the button is a "no-op" action.

local toolbar_buttons = {
  { label = "",                   command = 65535 },
  { label = "",                   command = 65535 },
  { label = "",                   command = 65535 },
  { label = "",                   command = 65535 },
  { label = "",                   command = 65535 },
  { label = "",                   command = 65535 },
  { label = "",                   command = 65535 },
  { label = "",                   command = 65535 },
  { label = "",                   command = 65535 },
  { label = "",                   command = 65535 },
  { label = "",                   command = 65535 },
  { label = "",                   command = 65535 },
  { label = "",                   command = 65535 },
  { label = "",                   command = 65535 },
  { label = "",                   command = 65535 },
  { label = "",                   command = 65535 },
  { label = "",                   command = 65535 },
  { label = "",                   command = 65535 },
  { label = "",                   command = 65535 },
  { label = "",                   command = 65535 },
  { label = "",                   command = 65535 },
  { label = "",                   command = 65535 },
  { label = "",                   command = 65535 },
  { label = "",                   command = 65535 },
  { label = "",                   command = 65535 },
  { label = "",                   command = 65535 },
  { label = "",                   command = 65535 },
  { label = "",                   command = 65535 },
  { label = "",                   command = 65535 },
  { label = "",                   command = 65535 },
  { label = "",                   command = 65535 },
  { label = "",                   command = 65535 },
  { label = "",                   command = 65535 },
  { label = "",                   command = 65535 },
  { label = "",                   command = 65535 },
  { label = "",                   command = 65535 },
  { label = "",                   command = 65535 },
  { label = "",                   command = 65535 },
  { label = "",                   command = 65535 },
  { label = "",                   command = 65535 },
  { label = "",                   command = 65535 },
  { label = "",                   command = 65535 },
  { label = "",                   command = 65535 },
  { label = "",                   command = 65535 },
  { label = "",                   command = 65535 },
  { label = "",                   command = 65535 },
  { label = "",                   command = 65535 },
  { label = "",                   command = 65535 },
  { label = "",                   command = 65535 },
  { label = "",                   command = 65535 },
  { label = "",                   command = 65535 },
  { label = "",                   command = 65535 },
  { label = "",                   command = 65535 },
  { label = "",                   command = 65535 },
  { label = "",                   command = 65535 },
  { label = "",                   command = 65535 },
  { label = "",                   command = 65535 },
  { label = "",                   command = 65535 },
  { label = "",                   command = 65535 },
  { label = "",                   command = 65535 },
  { label = "",                   command = 65535 },
  { label = "",                   command = 65535 },
  { label = "",                   command = 65535 },
  { label = "",                   command = 65535 },
}


------------------------------------
-------- Window settings -----------
------------------------------------

for k in ipairs(toolbar_buttons) do

    total_buttons = k

end

local button_rows = (total_buttons / buttons_per_row)
local gui_w       = (button_width * buttons_per_row) + ((buttons_per_row - 1) * button_h_spacer)
local gui_h       = (button_height * button_rows) + ((button_rows - 1) * button_v_spacer)

GUI.name = "TOOLBAR GRID TEMPLATE"
--GUI.x, GUI.y, GUI.w, GUI.h = 0, 0, 972, 240
GUI.x, GUI.y, GUI.w, GUI.h = 0, 0, gui_w, gui_h
--GUI.x, GUI.y, GUI.w, GUI.h = 0, 0, gui_w, 208
GUI.anchor, GUI.corner = "mouse", "C"


------------------------------------
-------- GUI Elements cont. --------
------------------------------------

local buttons_count     = -1    -- Leave this one alone or screwy things will happen

for k, v in ipairs(toolbar_buttons) do
  if row_buttons   == (buttons_per_row - 1) then    -- Set conditions for switching to a new row
      row_buttons   = 0
  else
      buttons_count = (buttons_count + 1)
  end

  elms["button_"..k] = {
    type = "Button",
    z = (#toolbar_buttons - k) + 1,
    x = ((k - 1) % buttons_per_row) * (button_width + button_h_spacer),
    y = math.floor((k - 1) / buttons_per_row) *  (button_height + button_v_spacer),
    w = button_width,
    h = button_height,
    caption = v.label,
    func = btn_click,
    params = {v.command},       -- Send command parameter to the btn_click function so that it will accept a variable.
    tooltip = "I'm a button"
  }

end

GUI.CreateElms(elms)


GUI.Init()
GUI.Main()
thanks so much for this, lokasenna. it's really great!
thanks,
babag
|
|
|
|
|
10-25-2019, 06:10 AM
|
#570
|
|
Human being with feelings
Join Date: Sep 2008
Location: Calgary, AB, Canada
Posts: 6,551
|
Quote:
Originally Posted by babag
edit: oh, yeah. how would i make the buttons darker?
|
Set the col_fill parameter when you create the buttons. It defaults to the "elm_frame" preset.
Button documentation: https://github.com/jalovatt/Lokasenn...ki/2.00-Button
Available color presets: https://github.com/jalovatt/Lokasenn...Core.lua#L1456
You can also use any color you want by providing a table of RGB values, 0-255, rather than a preset name. i.e.:
Code:
col_fill = {255, 0, 255} -- sexy pink
|
|
|
|
|
10-25-2019, 10:01 AM
|
#571
|
|
Human being with feelings
Join Date: Nov 2009
Posts: 2,232
|
hey, thanks for the color tip. having an issue, though. i put the parameters you offered as 'sexy pink' in as a test and it worked fine. when i went to start adjusting to something more to my own taste, though, i found that any value other than 0 seems to result in a full scale implementation. in other words, even if i put in 'col_fill = {1,1,1},' i get bright white. 0, 0, 0 is pure black. 1,1,1 should look imperceptibly lighter than pure black but looks the same as 255,255,255.
looking at presets now.
thanks again,
babag
|
|
|
|
|
10-25-2019, 10:26 AM
|
#572
|
|
Human being with feelings
Join Date: Sep 2008
Location: Calgary, AB, Canada
Posts: 6,551
|
My bad... again... I've been working on v3 for so long that I keep forgetting how v2 does things. Try using decimal values from 0-1 rather than 0-255, i.e. 128 would be 0.5.
Colors defined in GUI.colors before you call GUI.Init use 0-255, but since you're setting the colors on the elements on themselves it doesn't know to convert them.
This is one of the many things that v3 will simplify, thankfully.
|
|
|
|
|
10-25-2019, 10:35 AM
|
#573
|
|
Human being with feelings
Join Date: Nov 2009
Posts: 2,232
|
ah! so much better! thanks. looking forward to v3.
|
|
|
|
|
11-01-2019, 07:35 PM
|
#574
|
|
Human being with feelings
Join Date: Sep 2014
Posts: 2,643
|
Where would we be without this GUI !!!
Can I set defaults for "Menubox" (and others) so I can save and recall from REAPER.INI
reaper.BR_Win32_Write/GetPrivateProfileString
Code:
GUI.New("mnu_mode", "Menubox", 1, 64, 32, 72, 20, "Keyswitch Octave:", "1,2,3,4,5,6,7,8,9")
|
|
|
|
|
11-02-2019, 07:33 AM
|
#575
|
|
Human being with feelings
Join Date: Sep 2008
Location: Calgary, AB, Canada
Posts: 6,551
|
Sure, but you should never write anything to reaper.ini because Reaper a) can overwrite whatever it wants and b) Reaper only reads it at startup.
For scripts we use reaper-extstate.ini, and there are dedicated API calls for it: https://www.extremraym.com/cloud/rea...c/#SetExtState
For example, the boilerplate for loading my GUI:
Code:
local libPath = reaper.GetExtState("Scythe v3", "libPath")
if not libPath or libPath == "" then
    reaper.MB("Couldn't load the Scythe library. Please run 'Script: Scythe_Set v3 library path.lua' in your Action List.", "Whoops!", 0)
    return
end
The install script saves the path so other scripts can find it.
|
|
|
|
|
11-02-2019, 01:26 PM
|
#576
|
|
Human being with feelings
Join Date: Sep 2014
Posts: 2,643
|
So if I want "Keyswitch Octave:" to be set on "4" on running the GUI how do I set that ?
|
|
|
|
|
11-02-2019, 01:46 PM
|
#577
|
|
Human being with feelings
Join Date: Feb 2017
Posts: 4,820
|
Use reaper-extstate.ini with GetExtState and SetExState
Or you could do your own .ini and get and setter functions
|
|
|
|
|
11-02-2019, 02:10 PM
|
#578
|
|
Human being with feelings
Join Date: Sep 2008
Location: Calgary, AB, Canada
Posts: 6,551
|
Quote:
Originally Posted by MusoBob
So if I want "Keyswitch Octave:" to be set on "4" on running the GUI how do I set that ?
|
Can't test this right now, but something like:
Code:
local keyswitchOctave = reaper.GetExtState("yourScriptName", "keyswitchOctave")
if keyswitchOctave ~= "" then
  GUI.Val("mnu_mode", tonumber(keyswitchOctave)) -- Ext States are always strings
end

reaper.atexit(function()
  local keyswitchOctave = GUI.Val("mnu_mode")
  reaper.SetExtState("yourScriptName", "keyswitchOctave", keyswitchOctave, true)
end)
|
|
|
|
|
11-02-2019, 02:20 PM
|
#579
|
|
Human being with feelings
Join Date: Sep 2008
Location: Calgary, AB, Canada
Posts: 6,551
|
v3 update - all of the major stuff is done, and now I'm working on pre-release things like documentation.
At this point there shouldn't be any significant breaking changes, so it should be safe to start working on scripts with v3 or porting older scripts to it.
For obvious reasons, notably that it's not on ReaPack yet, it is NOT ready for use in released scripts.
Repo: https://github.com/jalovatt/scythe
Things left to do: https://github.com/jalovatt/scythe/i...223.0+Alpha%22
|
|
|
|
|
11-03-2019, 07:24 PM
|
#580
|
|
Human being with feelings
Join Date: Feb 2017
Posts: 4,820
|
Thanks ! i am curious but not in a hurry! 
I am thinking in a way to solve passing arguments in menu items after being clicked.
In your "Example - Menubar, Listbox, and TextEditor.lua" in v2 you have this menus structures
Code:
local menus = {
     {title = "File", options = {
        {"New",                 mnu_file.new},
...
I am wondering if there is a direct way to pass an argument to the function after clicking the menu item?
per example:
Code:
doSomething = function(arg)
-- doSomething
end

local menus ={}
for i=1, 20 do
    table.insert(menus, {"line"..1, doSomething(i)} )
end
...
How would you solve this?
Thanks a lot!
|
|
|
|
|
11-03-2019, 08:22 PM
|
#581
|
|
Human being with feelings
Join Date: Sep 2008
Location: Calgary, AB, Canada
Posts: 6,551
|
Quote:
Originally Posted by deeb
per example:
Code:
doSomething = function(arg)
-- doSomething
end

local menus ={}
for i=1, 20 do
    table.insert(menus, {"line"..1, doSomething(i)} )
end
...
How would you solve this?
Thanks a lot! |
v3 will allow you to specify parameters when you create the menu just like you can with Buttons, but in the meantime you can use a closure - a wrapper function that calls the "real" function with the parameter you want.
Instead of:
Code:
local menus = {

    {title = "File", options = {
        {"New", mnu_file.new},
Do:
Code:
local menus = {

    {title = "File", options = {
        {"New", function() mnu_file.new(someParameter) end},
|
|
|
|
|
11-03-2019, 11:32 PM
|
#582
|
|
Human being with feelings
Join Date: Sep 2014
Posts: 2,643
|
Quote:
Originally Posted by Lokasenna
Can't test this right now, but something like:
Code:
local keyswitchOctave = reaper.GetExtState("yourScriptName", "keyswitchOctave")
if keyswitchOctave ~= "" then
  GUI.Val("mnu_mode", tonumber(keyswitchOctave)) -- Ext States are always strings
end

reaper.atexit(function()
  local keyswitchOctave = GUI.Val("mnu_mode")
  reaper.SetExtState("yourScriptName", "keyswitchOctave", keyswitchOctave, true)
end)
|
WOO HOO !! it works great thanks.
And thanks for Script: Lokasenna_Duplicate selected notes diatonically.lua, I got that to work from the region chord name.
|
|
|
|
|
11-05-2019, 08:47 AM
|
#583
|
|
Human being with feelings
Join Date: Aug 2011
Posts: 522
|
This is for sure a dumb question but i find myself in the situation that i create the GUI with the builder first , then go do write some code that does stuff, then i realize i need more UI components.
Is there a way to open the semi-completed script again with the builder, so i can easily add components on top of whats already there?
|
|
|
|
|
11-05-2019, 09:19 AM
|
#584
|
|
Human being with feelings
Join Date: Sep 2008
Location: Calgary, AB, Canada
Posts: 6,551
|
Quote:
Originally Posted by reapero
This is for sure a dumb question but i find myself in the situation that i create the GUI with the builder first , then go do write some code that does stuff, then i realize i need more UI components.
Is there a way to open the semi-completed script again with the builder, so i can easily add components on top of whats already there?
|
Unfortunately not. I wanted to add that to the builder but realized I had made some poor choices in how it's structured so it would have been pretty messy. Once v3 is out I'm planning to rewrite the builder from scratch now that the GUI is a bit friendlier for it to work with.
In the meantime, I would suggest building the new elements you need, exporting them, and then pasting them into the existing script. If they're all meant to be together, you can add a couple of variables to their positions to make moving them as a group really easy:
Code:
local group = { x = 100, y = 100 }
local newElements = {
  {
    type = "Button",
    x = group.x + 0,
    y = group.y + 0,
    ...
  },
  {
    type = "Button",
    x = group.x + 48,
    y = group.y + 0,
    ...
  },
  {
    type = "Button",
    x = group.x + 24,
    y = group.y + 0,
    ...
  },
  {
    type = "Button",
    x = group.x + 48,
    y = group.y + 24,
    ...
  },
}
|
|
|
|
|
11-05-2019, 10:13 AM
|
#585
|
|
Human being with feelings
Join Date: Aug 2011
Posts: 522
|
i see. Thanks for the tip.
One other thing..can i add invisible buttons? I have a slider called "volume" and i have run out of space in the GUI, so i´d like to add an ivisible button on top of the slider´s name so that when i click on the slider name another screen appears.
Is that doable?
EDIT: Oh and another one. I want the user to be albe to create and save presets for this script. Whats the best approach to do that? I guess it has to come down to one of this "states". I only used projectextstates in other scripts but i guess those wont work here since i dont want the presets to be saved in the reaper project files but in the script itself, or the closest to it. Can you point me in the right direction here please?
Super thanks!
|
|
|
|
|
11-05-2019, 10:23 AM
|
#586
|
|
Human being with feelings
Join Date: Sep 2008
Location: Calgary, AB, Canada
Posts: 6,551
|
Quote:
Originally Posted by reapero
i see. Thanks for the tip.
One other thing..can i add invisible buttons? I have a slider called "volume" and i have run out of space in the GUI, so i´d like to add an ivisible button on top of the slider´s name so that when i click on the slider name another screen appears.
Is that doable?
|
I can't try it right now, but you should be able to with a Frame. Make sure it's in front of the slider (lower Z), set the color parameters to "none" (I think?) and then add a click handler:
Code:
function GUI.elms.myFrame:onmouseup()
  -- do stuff
end
Quote:
EDIT: Oh and another one. I want the user to be albe to create and save presets for this script. Whats the best approach to do that? I guess it has to come down to one of this "states". I only used projectextstates in other scripts but i guess those wont work here since i dont want them to be saved in scripts but in the script itself. Can you point me in the right direction here please?
Super thanks!
|
If you mean "open the script and have the elements set to A, B, C" then ExtStates are the way to go. ProjExtStates are stored in the .rpp, but ExtStates are global and can be set to persist when Reaper is closed and reopened.
If you mean exporting a separate preset action like some of my scripts do ("Lokasenna_Show only specified tracks", for instance) then... well, have a look at the script. It amounts to:
- Use comments to mark a section of the script to copy into the exported file
- Add a pair of functions to translate your settings to/from a Lua table
- Have the script check to see if it has a settings table on startup
- Write a new file, pasting the marked part of the script, and adding the settings table at the top
|
|
|
|
|
11-05-2019, 10:34 AM
|
#587
|
|
Human being with feelings
Join Date: Aug 2011
Posts: 522
|
Quote:
|
If you mean "open the script and have the elements set to A, B, C" then ExtStates are the way to go. ProjExtStates are stored in the .rpp, but ExtStates are global and can be set to persist when Reaper is closed and reopened.
|
This. Well not just that, but maybe have a dropdown selector (or anything else, really) with the different presets saved by the user. Selecting each preset should move the parameters of the different controls to the aproppriate values. Could the UI be updated dynamically when selecting each one of these presets via ExtState?
|
|
|
|
|
11-05-2019, 10:38 AM
|
#588
|
|
Human being with feelings
Join Date: Sep 2008
Location: Calgary, AB, Canada
Posts: 6,551
|
Quote:
Originally Posted by reapero
This. Well not just that, but maybe have a dropdown selector (or anything else, really) with the different presets saved by the user. Selecting each preset should move the parameters of the different controls to the aproppriate values. Could the UI be updated dynamically when selecting each one of these presets via ExtState?
|
Yup. Have a look at this script.
|
|
|
|
|
11-05-2019, 10:47 AM
|
#589
|
|
Human being with feelings
Join Date: Feb 2017
Posts: 4,820
|
Thank you Lokasenna! Will be back to it later! Thanks thanks ! All good!
|
|
|
|
|
11-05-2019, 04:48 PM
|
#590
|
|
Human being with feelings
Join Date: Nov 2009
Posts: 2,232
|
is there an example someplace of how i could use a mouseover for my toolbar? in looking around i found gui.isinside and onmouseover. they both sounded like they might do what i want (to have my toolbar buttons get lighter when the mouse is over them) but i didn't see examples and couldn't figure out where to start on my own.
thanks,
babag
|
|
|
|
|
11-06-2019, 07:51 AM
|
#591
|
|
Human being with feelings
Join Date: Sep 2008
Location: Calgary, AB, Canada
Posts: 6,551
|
Quote:
Originally Posted by babag
is there an example someplace of how i could use a mouseover for my toolbar? in looking around i found gui.isinside and onmouseover. they both sounded like they might do what i want (to have my toolbar buttons get lighter when the mouse is over them) but i didn't see examples and couldn't figure out where to start on my own.
thanks,
babag
|
Have a look at the Menubar class - it has to do the same thing for drawing the green hover indicator.
onmouseover turns the indicator on: https://github.com/jalovatt/Lokasenn...nubar.lua#L275
onupdate checks if it should be turned off: https://github.com/jalovatt/Lokasenn...nubar.lua#L232
|
|
|
|
|
11-08-2019, 07:43 AM
|
#592
|
|
Human being with feelings
Join Date: Aug 2011
Posts: 522
|
I am trying to let the user define the range of a slider (setting the min and max parameters of the Slider class). I use reaper.MB to get the max and min inputs, and when i look at the values on of each variables in IDE, it looks like i got them right.
The script however doesnt seem to take into account the new range values and keeps referencing the old ones, even if i have set the Slider like this:
Code:
GUI.New("Offset", "Slider", {
    z = 11,
    x = 64.0,
    y = 340,
    w = 96,
    caption = "Offset",
    min = offset_min,
    max = offset_max,
    defaults = {1000,1000},
    ....
What do i need to to so that, once the user enters the value in reaper´s message box, the range gets automatically updated in the GUI? Is reaper.defer() needed? I read about that GUI.func in the tutorial but i am not really sure how to use it in this case.
|
|
|
|
|
11-08-2019, 09:13 AM
|
#593
|
|
Human being with feelings
Join Date: Sep 2008
Location: Calgary, AB, Canada
Posts: 6,551
|
Quote:
Originally Posted by reapero
I am trying to let the user define the range of a slider (setting the min and max parameters of the Slider class). I use reaper.MB to get the max and min inputs, and when i look at the values on of each variables in IDE, it looks like i got them right.
The script however doesnt seem to take into account the new range values and keeps referencing the old ones, even if i have set the Slider like this:
Code:
GUI.New("Offset", "Slider", {
    z = 11,
    x = 64.0,
    y = 340,
    w = 96,
    caption = "Offset",
    min = offset_min,
    max = offset_max,
    defaults = {1000,1000},
    ....
What do i need to to so that, once the user enters the value in reaper´s message box, the range gets automatically updated in the GUI? Is reaper.defer() needed? I read about that GUI.func in the tutorial but i am not really sure how to use it in this case. |
Sliders are tricky because they do a bunch of internal calculations in their :new method. If I remember correctly from making the GUI Builder you should probably just delete the existing slider and create a new one in its place.
Alternatively, if the number of steps is always the same you could have the Slider use 0 to 100 or something and then use its Output parameter to just change the values that are displayed to the user.
|
|
|
|
|
11-08-2019, 11:57 AM
|
#594
|
|
Human being with feelings
Join Date: Mar 2007
Location: Denver, CO
Posts: 633
|
Quote:
Originally Posted by Lokasenna
v3 update - all of the major stuff is done, and now I'm working on pre-release things like documentation.
|
I've just downloaded this to look around. Is there a way to tell from within reaper's action window which scripts are scythe and which are LGUI? The demo scripts all have the same name in both libraries.
Also, I'm unclear what the table in the upper left of the images demo is supposed to do... I'm looking through the code, maybe I'll figure it out.
Anyway, the weather is getting cold, time to get back to software, after a summer of hardware. Looking forward to trying this out....
cheers!
-eric
Last edited by woodslanding; 11-08-2019 at 12:02 PM.
|
|
|
|
|
11-08-2019, 12:08 PM
|
#595
|
|
Human being with feelings
Join Date: Sep 2008
Location: Calgary, AB, Canada
Posts: 6,551
|
Quote:
Originally Posted by woodslanding
I've just downloaded this to look around. Is there a way to tell from within reaper's action window which scripts are scythe and which are LGUI? The demo scripts all have the same name in both libraries.
|
Whoops, no. I always use the "Run a ReaScript..." action and find them myself so that hadn't occurred to me.
Quote:
|
Also, I'm unclear what the table in the upper left of the images demo is supposed to do... I'm looking through the code, maybe I'll figure it out.
|
I borrowed it from some scripts I made for Tod - they're just there to show hover and click states, and as an example of laying things out dynamically.
|
|
|
|
|
11-08-2019, 01:36 PM
|
#596
|
|
Human being with feelings
Join Date: Aug 2011
Posts: 522
|
The number of steps is gong to be the same everytime, but the values emitted by the slider should be different of course depending on the range.
For example a 0-100 range wont be able to output a value of 200, so the user will need to widen this range to reach this value.
After reading about the output parameter I dont think this is meant to do that right? Regenerating all the sliders looks complicated, since I need to do this on several all of them. Do you happen to have an example on how to create/substitute components?
Thx
|
|
|
|
|
11-08-2019, 01:50 PM
|
#597
|
|
Human being with feelings
Join Date: Sep 2008
Location: Calgary, AB, Canada
Posts: 6,551
|
Quote:
Originally Posted by reapero
The number of steps is gong to be the same everytime, but the values emitted by the slider should be different of course depending on the range.
For example a 0-100 range wont be able to output a value of 200, so the user will need to widen this range to reach this value.
After reading about the output parameter I dont think this is meant to do that right?
|
If you give it a function for the output parameter, the value will be passed to that and whatever it returns will be displayed to the user. If the slider is 0-1 internally (makes the math easier than 0-100) you should be able to map that to the user's display range with:
Code:
local userMinimum = 20
local userMaximum = 200

mySlider.output = function(internalValue)
  return userMinimum + internalValue * (userMaximum - userMinimum)
end
(At work and can't test it right now)
Just remember that you'll also have to run the value through that function when you want to do whatever it is you're doing with the slider's value; GUI.Val("mySlider") will still return values based on how the slider itself is set.
Quote:
|
Regenerating all the sliders looks complicated, since I need to do this on several all of them. Do you happen to have an example on how to create/substitute components?
|
As long as you have all of the parameters you created it with the first time - z, x, y, caption, defaults, etc - stored somewhere, I believe replacing the slider should just be a matter of using GUI.New to create a new slider with the same name and whatever parameters you want it to have - that will delete the old one and force a redraw.
|
|
|
|
|
11-08-2019, 02:51 PM
|
#598
|
|
Human being with feelings
Join Date: Aug 2011
Posts: 522
|
Thanks for the explanation. Both approaches look much more simple now.
I'll give this a try again on Monday.
Cheers!
|
|
|
|
|
11-09-2019, 03:08 AM
|
#599
|
|
Human being with feelings
Join Date: Mar 2007
Location: Denver, CO
Posts: 633
|
I'm very curious:
what motivated you to move to double quotes in the new code? I've become very partial to Lua's use of single quotes, and it sounds like you even deviated from your chosen style guide to do it.... is there a particular reason?
|
|
|
|
|
11-09-2019, 06:52 AM
|
#600
|
|
Human being with feelings
Join Date: Sep 2008
Location: Calgary, AB, Canada
Posts: 6,551
|
Quote:
Originally Posted by woodslanding
I'm very curious:
what motivated you to move to double quotes in the new code? I've become very partial to Lua's use of single quotes, and it sounds like you even deviated from your chosen style guide to do it.... is there a particular reason?
|
The previous versions were all double quotes as well. As for why:
- Laziness; everything was already doubles when I started working Javascript and realized that single quotes are popular.
- Outside of that style guide, double quotes seem to be the standard for Lua. The reference manual, Programming In Lua, and lua-users.org all use doubles.
- IMO doubles make slightly more sense since single quotes/apostrophes are more likely to appear in a UI's text.
The biggest thing to me is consistency, though. If someone submitted a pull request where they'd changed everything to single quotes I'd probably accept it and start using singles because I use them in Javascript all day anyway.
|
|
|
|
| Thread Tools |
|
|
| Display Modes |
 Linear Mode Linear Mode
|
 Posting Rules
|
You may not post new threads
You may not post replies
You may not post attachments
You may not edit your posts
HTML code is Off
|
|
|
All times are GMT -7. The time now is 12:23 AM.
|